The Intro
Let me start with a very, very important disclaimer:
I hate computers.
Well, more specifically, computers hate me. Within a week of joining the team here at Stardock, the guys in IT already knew my name and had to come down to fix computer issues multiple times. I also had a motherboard burst into flames on me once (STILL trying to figure that one out) and smoked a power supply (these occurred within months of each other), so I’m pretty sure our PC overlords have it out for me or something.

That said, when I decided I wanted to try building my own PC this time around, I got my head checked - and then went and built it anyway. I knew what I needed it to be able to do - admittedly, it’s a rather short list of criteria, and wasn’t hard to attain considering my previous PC was about 10 years old.
The new computer needed to:
- Run games (specifically Final Fantasy XIV) smoothly
- Have lots of disk space (I like to video edit and play in photoshop with screenshots)
- Have the capacity to stream gameplay (which is as much on my ISP as the computer)
- Do other cool things (I’m very technical, aren’t I?)
I definitely learned a lot during the build process, but I think the most educational part of all of this came before the actual construction: researching the specs. We’ll start there.
The Prep
I know lots of “computer people.” Heck, I work in an office full of them. I figured that asking around for people’s opinions and experiences would give me a valuable fountain of information - and it did! Except, I discovered also that computer builds are like opinions: everyone has one and they’re not all created equal.
The problem is, none of the builds are really wrong - what one person says is a great processor or a solid choice for a cooling system, another person says sucks and suggests something completely different. I’ve found that personal experience with certain components and brands varies pretty broadly, so everyone is “right” in a way -- which made choosing what I was putting into this PC really challenging!
Ultimately, my build ended up looking something like this:
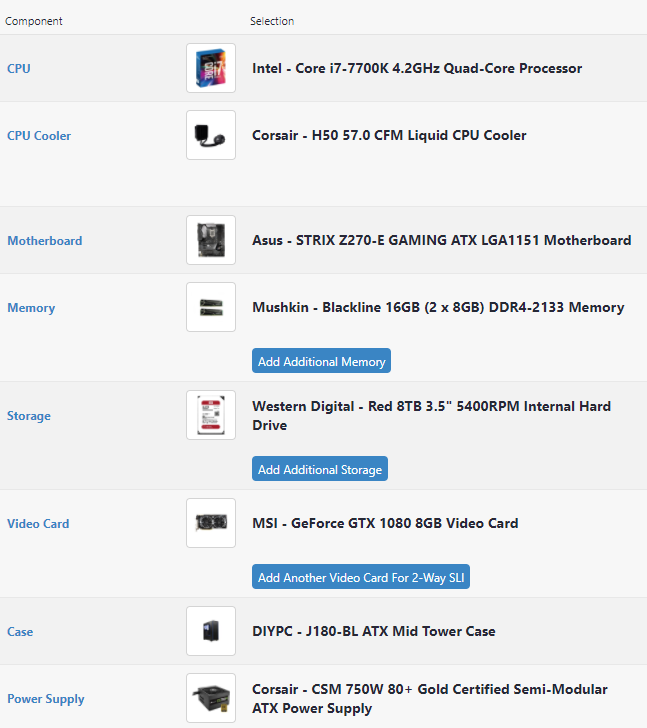
I repurposed 3 additional hard drives from my previous PC, including a small solid state that now runs my OS (Windows 10, for the curious). I also recycled my CD/DVD drive from there, too. I bought my parts over the course of about 2 months, snagging sales when they were available and sending in rebates whenever I could.
This process was definitely tedious, but it was worth the wait in order to save some cash. My budget limit was $1500, and when all was said and done I came in around $1100. Note: this is just for the tower, I didn’t purchase a new monitor, keyboard, or any other accessories.
The Help
This is Gus.

I trusted Gus to help me when it came time for the actual construction. ...questioning my judgement, yet? Yeah, me too. 
In all seriousness, Gus is a software engineer and a totally awesome (and blessedly patient) friend, so I felt a lot more relaxed when he said he’d guide and instruct me. While I was definitely determined to get in there and work on the PC myself, I wasn’t crazy enough to do it without some semblance of adult supervision.
Gus also assisted me in hunting deals and finalizing the parts I’d need based on what I wanted to do with the computer (which, as we established above, isn’t anything super fancy). We left some room for upgrades later (I’d like to go to 32 gigs of RAM when I’m able), but didn’t really consider building for Overclocking. That’s an art, and it isn’t one I’m personally willing to dive into right now. Once we had all the parts (the final piece arrived for me at work on Dec. 20th), it was time to do what I was most excited (and terrified) about: put it together.
To be continued...